Hi,I'd like to share how to create digital signature by using adobe reader and webcam Today.
But honestly I'd like to say it's only work with pdf format document and you need PC/Laptop with Webcam.
Nowadays, we are working with electronics document and all of time we need our signature on that.
So, mostly we print out document as hard-copy and do signature on that and scan that document again as completed document with signature.
Don't you bother for this a lot of steps?
Now I'm gonna show you how to bypass those boring steps.
First, open the PDF document in Adobe Reader as show below picture. If Adobe Reader detects a signature field, it’ll prompt you to open the Sign pane. If not, just click the Sign button at the top-right corner.
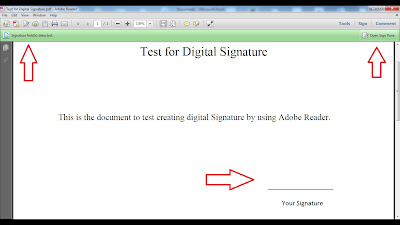
Use the Place Signature option to use a real signature.
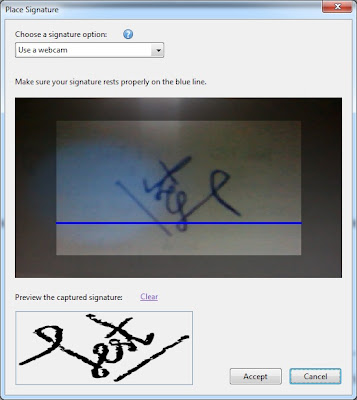
Choose "Use a webcam" option when you have asked. I believe this is more convenient for most of people.


Then sign a piece of white paper in black ink, hold it up to your webcam, and scan it in.
Once you have scanned your signature, use the Place signature button to insert and position it anywhere in a PDF document.


You only have to scan in your signature once and you can quickly insert your signature in other documents in the future.
You can now save your PDF file using the standard Save option under the File menu.
After your document saved, Adobe will prompt you to use Adobe EchoSign to send your signed document. Just choose "Not now".

May you all be happy.
(Be knowledgeable, pass it on then)
But honestly I'd like to say it's only work with pdf format document and you need PC/Laptop with Webcam.
Nowadays, we are working with electronics document and all of time we need our signature on that.
So, mostly we print out document as hard-copy and do signature on that and scan that document again as completed document with signature.
Don't you bother for this a lot of steps?
Now I'm gonna show you how to bypass those boring steps.
First, open the PDF document in Adobe Reader as show below picture. If Adobe Reader detects a signature field, it’ll prompt you to open the Sign pane. If not, just click the Sign button at the top-right corner.

Use the Place Signature option to use a real signature.
Choose "Use a webcam" option when you have asked. I believe this is more convenient for most of people.


Then sign a piece of white paper in black ink, hold it up to your webcam, and scan it in.
Once you have scanned your signature, use the Place signature button to insert and position it anywhere in a PDF document.


You only have to scan in your signature once and you can quickly insert your signature in other documents in the future.
You can now save your PDF file using the standard Save option under the File menu.
After your document saved, Adobe will prompt you to use Adobe EchoSign to send your signed document. Just choose "Not now".

Take note one thing that I was used Adobe Reader XI to create this post. I haven't test with any older Adobe Version.
May you all be happy.
(Be knowledgeable, pass it on then)

Good Post! Thank you so much for sharing this pretty post, it was so good to read and useful to improve my knowledge as updated one, keep blogging…
ReplyDeleteelectronic signature
After reading your article I was amazed. I know that you explain it very well. And I hope that other readers will also experience how I feel after reading your article. Digital Signature
ReplyDeleteThis blog is very nice and informative about Rent Agreement . Thanks for sharing this blog. I am waiting for your next articles. Keep it up.
ReplyDelete